
Published March 22, 2026 - Updated September 3, 2026 - By Xilly
RTX 5090 and 50 Series Optimization Guide
A practical RTX 5090 and 50-series setup covering clean drivers, NVIDIA settings, Profile Inspector, Resizable BAR, and measured GPU tuning without promising one universal gain.
GPU Optimization Guides PC Optimization Guides Reduce Input Lag Guides
GPU Optimization Guide · RTX 50 Series
You just dropped serious money on an RTX 50 series GPU and the FPS numbers don't match what you've seen online. Or maybe they're close - but you know there's more in there. This is the exact process I run on every Nvidia GPU that comes through Xilly: clean driver installs, control panel optimization, Profile Inspector tweaks, Resizable BAR configuration, and Afterburner overclocking. No hardware changes. On average, 10-15% higher FPS compared to a stock out-of-box setup.
Tools & Downloads
Download everything before you start. All four tools are free. Having them ready before you boot into Safe Mode means you don't have to interrupt the process mid-way.
Step 1: Uninstall Your Current GPU Drivers with DDU
Before touching any new driver, the old one needs to be completely gone. Nvidia's built-in uninstaller leaves behind registry entries, telemetry hooks, leftover profiles, and stale shader caches. Every one of those is a potential source of stutters or degraded performance. Display Driver Uninstaller (DDU) removes all of it cleanly.
Most people update their drivers 10+ times without ever fully cleaning them. That's why performance tanks or stutters come back after a "fresh" install. DDU is non-negotiable as a first step.
-
1Boot into Safe Mode
Press
Win + R, typemsconfig, go to the Boot tab, check Safe Boot, press Apply → OK, then restart. -
2Pre-disable Safe Mode for next boot
Once back on desktop in Safe Mode, press
Win + R→msconfig→ Boot tab → uncheck Safe Boot → Apply → OK. Do not restart yet. This ensures the next restart after DDU goes back to normal mode automatically. -
3Configure DDU
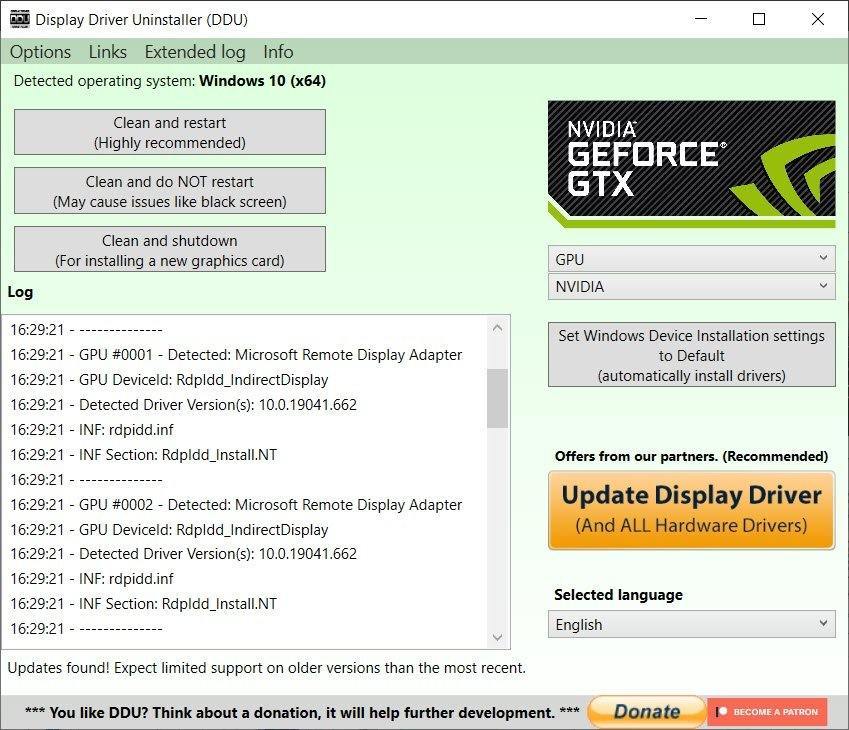
Open DDU. Uncheck Create a System Restore Point if not needed. Check Remove PhysX. Uncheck Remove Nvidia Broadcast and Remove Nvidia Control Panel from Microsoft Store.
-
4Run the clean
Set Device Type to GPU, manufacturer to Nvidia, then click Clean and Restart. Done.
Step 2: Install a Debloated Driver with NV Clean Install
Nvidia's standard driver package comes bundled with GeForce Experience, telemetry services, container processes, and other components that consume background CPU cycles and interfere with latency. NV Clean Install lets you strip all of that and install only what the GPU actually needs to run.
NV Clean Install lets you export the configured driver as an offline package. Build one so you have a pre-debloated driver ready for reinstalls or other machines without going through the setup again.
Step 3: Nvidia Control Panel Settings for Maximum FPS
Right-click your desktop → Nvidia Control Panel. These settings directly affect GPU workload scheduling and frame time consistency - not just raw FPS numbers.
While in Windows Display Settings, verify your monitor refresh rate is set to its maximum. This is a surprisingly common oversight that caps FPS headroom at the OS level.

Step 4: Nvidia Profile Inspector - Advanced GPU Tweaks
Nvidia Profile Inspector exposes settings that Nvidia doesn't surface in the standard Control Panel. Download it from GitHub, open it, and make sure you're on the Global Driver Profile.
0x1.Step 5: Hardware-Accelerated GPU Scheduling & Resizable BAR
Two more settings that together reduce CPU-GPU scheduling overhead and memory transfer bottlenecks. Both are free performance with no stability risk on RTX 50 series hardware.
-
1Enable HAGS in Windows
Display Settings → Graphics → Advanced Graphics Settings → Hardware-Accelerated GPU Scheduling: On. If Variable Refresh Rate appears here and you use G-Sync, enable it. Otherwise leave off.
-
2Enable Resizable BAR in BIOS
Restart into BIOS (spam Delete on POST). Navigate to your PCIe/Advanced settings. Enable Above 4G Decoding first, then enable Re-Size BAR Support. Save and exit.
-
3CSM must be Disabled
If Re-Size BAR is grayed out, your system is likely running in CSM/legacy mode. Go to Boot → CSM and set to Disabled. Verify you are on UEFI, not legacy boot, before doing this - otherwise Windows won't load.
Confirm your Windows installation is on a GPT-formatted drive and booting via UEFI before disabling CSM. If you're on MBR/legacy, disabling CSM will prevent Windows from loading. Check Disk Management - your system drive should show a 100-300MB EFI System Partition.
Step 6: MSI Afterburner - RTX 50 Series Overclock
RTX 50 series cards with GDDR7 memory have significant overclocking headroom. Based on hundreds of systems processed at Xilly, the following starting values are stable for nearly every RTX 50 series card.
Validate stability by running a Time Spy benchmark or triggering a
shader preload in Call of Duty or another heavy title. If the system crashes or artifacts
appear, reduce memory clock by 200 MHz increments until stable.
Open the Curve Editor in Afterburner and target 950-975 mV for 2800 MHz boost. This reduces operating temperature while maintaining the same or higher sustained clocks - the GPU runs cooler, boosts longer, and stays within power limits more consistently.

Real-World Results: Before vs. After Full Optimization
Same system, same settings, same conditions - only difference is the full optimization stack above applied vs. stock out-of-box configuration.
These numbers are before any deeper Windows or BIOS-level optimization. The ceiling is higher.
Quick Reference Checklist
Frequently Asked Questions
What is the best Nvidia driver version for RTX 50 series?
Driver version differences are game-specific and rarely exceed 1-2% FPS in any title. The real performance gain comes from how clean the driver is installed, not which version you're on. Using DDU to fully strip old drivers and NV Clean Install to remove telemetry and bloat fixes the overwhelming majority of driver-related performance loss. Start on the latest driver and focus on the install process, not the version number.
How much FPS can I gain from optimizing my RTX 50 series GPU?
The full optimization stack - clean driver install, Control Panel settings, Profile Inspector tweaks, Resizable BAR, and Afterburner overclocking - averages 10-15% higher FPS compared to stock. In competitive titles at high framerates (400-1000+ FPS), the absolute frame count gains are larger because the GPU is working closer to its ceiling.
Is +2000 MHz memory clock safe on RTX 50 series?
Yes, in the vast majority of cases. GDDR7 memory on RTX 50 series has significantly higher overclocking headroom than GDDR6X on the previous generation. Based on hundreds of RTX 50 series cards processed at Xilly, +2000 MHz is a stable starting point for almost all cards. Always validate with a benchmark before leaving the overclock permanently applied.
Does Resizable BAR actually improve FPS on RTX 50 series?
Yes. Resizable BAR allows the CPU to access the full GPU VRAM in a single BAR operation rather than in small chunks. This reduces CPU-GPU transfer overhead and provides measurable FPS gains in most modern titles. On RTX 50 series, enabling it both in BIOS and via Nvidia Profile Inspector ensures the driver utilizes it correctly regardless of board firmware behavior.
Want Your Entire System Optimized?
GPU is just one layer. My team at Xilly handles BIOS, Windows, drivers, RAM, and network - the full stack, done manually for your specific hardware. Thousands of systems optimized for pros and competitive gamers.
View Optimization Packages