
Published March 21, 2026 - Updated March 22, 2026 - By Xilly
Optimizing Intel i9 for Gaming: The Ultimate Gigabyte Z790 Guide
A step-by-step guide to optimizing Intel i9 performance on Gigabyte Z790 motherboards, preventing CPU degradation and ensuring stable gaming performance.
BIOS Optimization Guides PC Optimization Guides

BIOS Guide · Intel 14th Gen
Intel 14th Gen CPUs are among the highest-performing chips on the market - and also among the
most mishandled by default motherboard firmware. On a Gigabyte Z790 with all limits unlocked and
voltage left on Auto, the board can spike Vcore to 1.6V or higher. That level of
voltage sustained over weeks turns a new i9 into a degraded mess within 3-8 months.
This guide locks that down.
This guide is written for 14th Gen Intel i9/i7 chips on Gigabyte Z790. 13th Gen owners can use it as a reference, but should validate voltage, core, and memory behavior instead of copying every value directly.
I've dialed in this configuration across thousands of client machines - including top competitive Fortnite players. Everything here is tested on real hardware, not theory. Follow it exactly and you'll get the performance ceiling of your CPU without destroying it in the process.
Cooling Requirements for Intel 14th Gen on Z790
If your cooler is undersized or your thermal paste is dried out, none of the settings below
will help you. Intel 14th Gen i9s pull 250-360W under full load. Skip ahead,
ignore this, and you'll be thermal throttling the moment a game loads shaders.
How to Enter Gigabyte Z790 BIOS Advanced Mode
Boot into BIOS (typically Delete or F2). If you land in Easy Mode, click Advanced Mode at the top. Navigate to the Tweaker tab - every setting in this guide lives there or in its sub-menus.
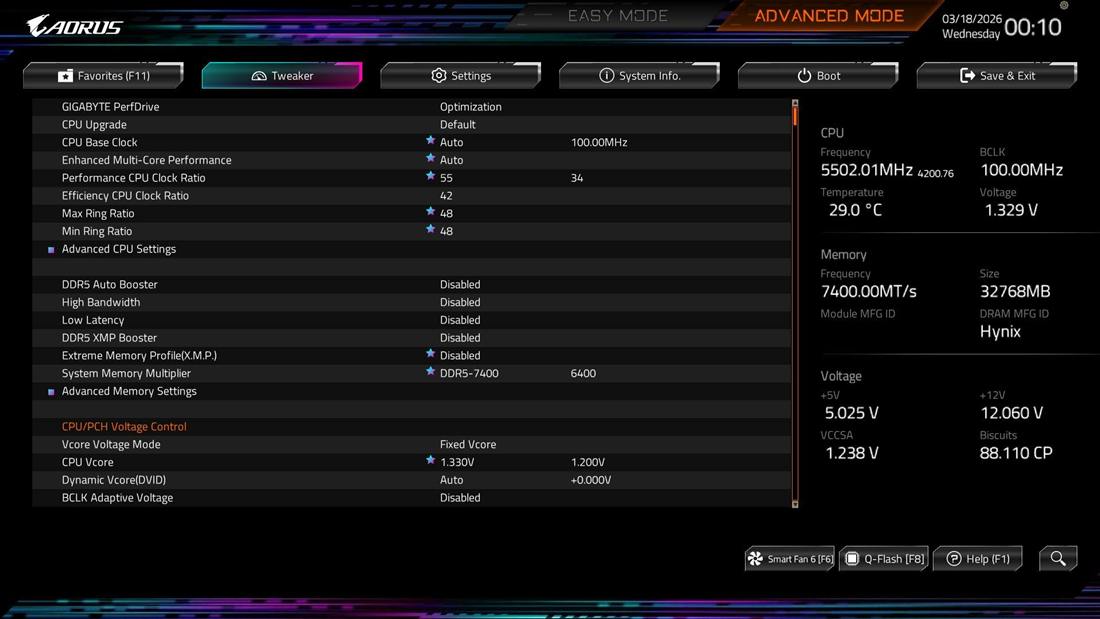
Gigabyte Z790 Tweaker Settings: PerfDrive Unleash & Intel Default Settings
1.6V spikes. This combination will destroy your CPU
within weeks. Never leave voltage on Auto with Unleash active.
Intel 14th Gen Static CPU Clock Ratios: P-Core & E-Core Configuration
With dynamic boost algorithms disabled (covered in the next section), you need to set static P-core and E-core multipliers manually. This is how you control exactly what your CPU runs at - no variance, no algorithm interference.
56× first. CPU used for months: start at 54×
and drop by 2× increments if unstable. Degraded chips may settle at
52× or lower.
Advanced CPU Settings: Disable Turbo, C-States & Dynamic Features for Gaming
With a static clock locked, every dynamic boost feature becomes redundant - and each one adds scheduling overhead, voltage instability, or thermal variability. Disable all of them.

Z790 XMP Memory Profile: Best DDR5 Speed for Stability
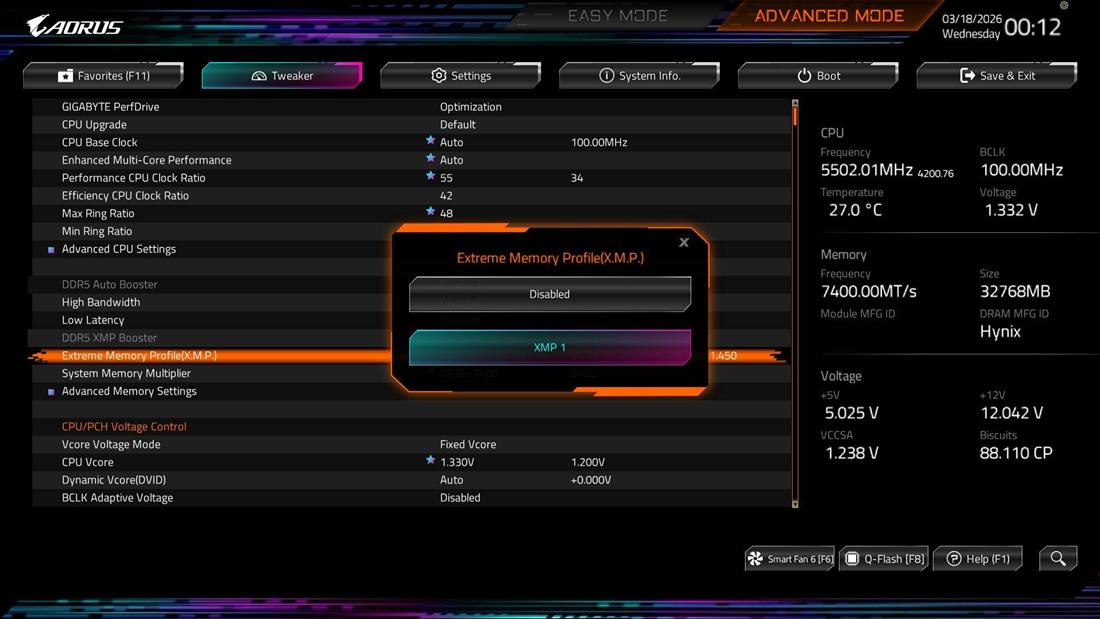
7200 MT/s XMP profiles.
The Z790 AORUS Elite AX (refresh) handles 7200 natively. On the base board, target
6800 MT/s for stability - set System Memory Multiplier manually if XMP 1
defaults higher.
Enable Resizable BAR on Gigabyte Z790 for Free GPU Performance

Safe Vcore Voltage for Intel i9 14th Gen: Fixed Mode & Hard Limits
Do not exceed 1.30V Vcore under any configuration. Going above this
threshold without exceptional cooling accelerates electromigration. The daily-driver
recommendation is 1.28V. Going to 1.30V is only warranted
if crashing persists at 1.28V with LLC set to Turbo.
1.20V in HWiNFO64.Best LLC Setting for Gigabyte Z790: Load Line Calibration Explained
LLC controls how aggressively the VRM compensates for voltage droop when the CPU transitions from idle to full load. Higher LLC = tighter voltage delivery under load.
1.28V set in BIOS results in approximately 1.20V
actual load voltage - verified in HWiNFO64. This is expected and correct behavior.
The ~1.272V idle reading is also normal; it drops to load voltage when
the CPU hits full utilization.
How to Stability Test Intel 14th Gen After BIOS Changes
Don't just save and boot into Windows hoping it's stable. Validate the configuration properly. Shader preload tests are the preferred method - they stress all cores at real-world instruction mixes. OCCT Extreme is the fallback.
Call of Duty and Marvel Rivals both have shader compilation passes on launch (or manually via Settings → Graphics → Restart Shaders). These saturate all cores at real-world IPC patterns. If you pass this, you'll be stable in-game.
Open OCCT → CPU → Extreme. Load Type: Variable. Run for 5-10 minutes.
Zero errors = pass. Note: you can error in OCCT and still be game-stable. Blue screens in
OCCT = real instability that needs to be resolved before gaming.
Core VID ≠ Vcore: OCCT may display values like 1.55V next to
voltage. That is the CPU's requested VID, not actual Vcore. Scroll to the dedicated Vcore
sensor to see real measured voltage. Expect approximately 1.20V at load with
Turbo LLC + 1.28V fixed.
Intel 14th Gen BIOS Instability Troubleshooting: Crashes & Blue Screens
-
1Errors in OCCT / shader test - no crash
Raise Vcore from
1.28V → 1.30V. Re-run. Errors should reduce or disappear. -
2Blue screen during stress test at 1.28V
Raise to
1.30V. If blue screen persists, voltage is not the constraint - clock ratio is too high for this CPU's current state. Proceed to step 3. -
3Blue screen persists at 1.30V
Drop P-core clock ratio by
2×(e.g.,54× → 52×). Repeat until stable. Degraded CPUs may settle at50×or lower. -
4Idle temps above 60°C / gaming above 85°C
Re-enable all power-saving features disabled in this guide. Fix cooling (paste, mount pressure, cooler upgrade) before any overclocking configuration is applied.
-
5CPU degraded beyond self-tuning threshold
Intel's warranty covers degradation. Requirements: original CPU box (serial number on exterior) + proof of purchase. Contact Intel support directly for a free replacement.
Post-Boot Verification: Expected HWiNFO64 Readings After Z790 Optimization
Gigabyte Z790 BIOS Settings Quick Reference Checklist
Frequently Asked Questions
Why does the Gigabyte Z790 cause Intel CPU degradation?
With all power limits unlocked and voltage left on Auto, the Z790 can push Vcore to
1.6V or higher. Intel 14th Gen CPUs aren't rated for sustained voltage at
that level - electromigration damage accumulates fast, and most users see degradation
within 3-8 months. The fix is manually locking Vcore to 1.28V
in Fixed mode. Never run Unleash with Auto voltage.
What is the safe Vcore voltage for Intel i9 14th Gen on Z790?
The recommended daily-driver voltage is 1.28V Fixed Vcore with LLC set to
Turbo. The absolute ceiling is 1.30V for unstable configurations only.
With Turbo LLC, actual load voltage reads approximately 1.20V in HWiNFO64
- this is expected droop compensation, not a misread.
What LLC setting should I use on Gigabyte Z790 for Intel 14th Gen?
Set CPU Vcore Load Line Calibration to Turbo. This tightens voltage
delivery under load so the CPU receives consistent voltage rather than drooping heavily
when transitioning from idle to full load. Combined with 1.28V Fixed Vcore,
Turbo LLC results in approximately 1.20V actual measured load voltage.
Should I disable C-States on Intel 14th Gen for gaming?
Yes. C-States introduce latency every time the CPU transitions from an idle sleep state back to active. For competitive gaming where consistent 1% lows and frame pacing matter, disabling C-States reduces micro-stutter and input latency. The trade-off is slightly higher idle power consumption - acceptable for a dedicated gaming machine.
Can I get my degraded Intel 14th Gen CPU replaced for free?
Yes. Intel's warranty covers 14th Gen degradation. You need the original CPU box (serial number is printed on the exterior) plus proof of purchase. Contact Intel support directly. This is why you should always keep your CPU boxes.
What XMP speed should I use on Gigabyte Z790?
Target 6800 MT/s via XMP 1 on the standard Z790. The Z790 AORUS Elite AX
refresh handles 7200 MT/s natively, but the base board has stability issues
at that speed. If your XMP profile defaults higher, manually set System Memory Multiplier
to DDR5-6800.
Want This Done For You?
Our Competitive Optimization service covers BIOS configuration, static OC, RAM overclocking, driver optimization, and full system dialing - done manually, not with scripts.
View Optimization Packages