Published March 25, 2026 - Updated March 29, 2026 - By Xilly

AMD Ryzen 7 9800X3D BIOS Optimization

This is the exact BIOS configuration I run on every 9800X3D system that comes through Xilly, from BIOS updates through Precision Boost Overdrive, Curve Optimizer, memory tuning, and fan control.

Ryzen 7 9800X3D BIOS optimization guide cover

BIOS Guide  ·  AMD Ryzen 9000 Series

By Xilly CPU: Ryzen 7 9800X3D Board: ASUS X870-F Strix Memory: DDR5-6000

The Ryzen 7 9800X3D is the best gaming CPU available right now - and most people are running it on stock BIOS settings, leaving a significant amount of performance on the table. This is the exact BIOS configuration I run on every 9800X3D system that comes through Xilly, from BIOS updates through Precision Boost Overdrive, Curve Optimizer, memory tuning, and fan control. Real benchmark results included - 47 FPS gain in Call of Duty, 55 FPS gain in Fortnite, purely from BIOS configuration.

Step 1: Update Your BIOS Before Anything Else

AMD continuously improves the AGESA microcode for X3D CPUs. I've seen 5-10 FPS differences just from BIOS updates on X3D chips. Never skip this step, especially on a fresh build with new hardware.

Why BIOS Updates Matter for X3D CPUs

AMD refines Precision Boost Overdrive behavior, memory training, and power delivery algorithms through AGESA microcode updates pushed via BIOS. An outdated BIOS can cap boost clocks, cause memory instability, or leave memory controller tuning broken. Always verify you're on the latest version before any other optimization.

  1. 1
    Find your current BIOS version

    Press Win + R, type msinfo32, and check the BIOS Version field. On the ASUS X870-F, the shipped version was 1203 - the latest at time of writing is 2103.

  2. 2
    Download the latest BIOS

    Search your exact motherboard model, confirm it matches what msinfo32 shows, then go to Driver & Tools → BIOS & Firmware on the ASUS support page and download the latest version.

  3. 3
    Create a FAT32 partition for the update

    Open Disk Management (Win + Rdiskmgmt.msc). Right-click your C: drive → Shrink Volume → shrink by 100 MB. Right-click the unallocated space → New Simple Volume → format as FAT32, label it BIOS. Copy the BIOS file to this partition.

  4. 4
    Flash via ASUS EZ Flash 3

    Boot into BIOS → Advanced Mode → Tool tab → ASUS EZ Flash 3 Utility. Select your BIOS partition, find the update file (~96 MB), click it, confirm twice, and let it flash. Do not power off during this process.

Step 2: ASUS X870-F BIOS Layout Overview

After updating, boot back to BIOS and go to Advanced Mode (bottom right). Here's where everything lives:

ASUS X870-F BIOS Tab Map
AI Tweaker
Memory & CPU OC
DOCP/EXPO profiles, memory frequency, timings, Precision Boost Overdrive, Curve Optimizer.
Advanced
System Configuration
CPU configuration, PCIe settings, USB, onboard devices, AMD CBS - all system-level toggles.
Monitor
Hardware & Fan Control
Temperature readings, voltage monitoring, Q-Fan fan curve configuration.
Boot
Boot Order & Secure Boot
Tool
EZ Flash, ASUS User Profile
BIOS flashing utility and profile save/load.

Step 3: DDR5 Memory Configuration - Why DDR5-6000 is the Target

Memory configuration is one of the highest-impact BIOS changes on AM5. The Ryzen 9000 series has a tight relationship between memory speed and the Unified Memory Clock (UCLK) - getting it right means faster cache access, lower latency, and better 1% lows.

The DDR5-6000 Rule for AM5

At 6000 MT/s, the memory controller runs in a 1:1 ratio with the Unified Memory Clock (UCLK = MEMCLK). This is the performance sweet spot for all current Ryzen 9000 X3D CPUs. Going above 6000 requires more SOC voltage, introduces instability risk, and delivers minimal gaming gains on X3D CPUs whose L3 cache architecture already minimizes memory latency sensitivity.

AI Tweaker → Memory Settings
AI Overclock Tuner
DOCP1 / EXPO1 / XMP1
Always use the Profile 1 variant - whichever label appears for your kit. Profile 1 loads primary timings from the SPD and lets the board train secondaries itself. DOCP2/EXPO2 loads the full manufacturer profile, which is typically slower than board-trained timings.
Memory Frequency
DDR5-6000
If your RAM is rated above 6000 MT/s (e.g., 7200 MT/s), manually drop it to 6000. Running above 6000 on AM5 without FCLK tuning causes the memory controller to drop to a 2:1 ratio, which hurts latency and gaming performance.
Refresh Interval
32767
TRDL
12
Solid timing for DDR5-6000 compatible with most memory kits.
TRDS
8
Bank Swap Mode
Swap APU
Optimizes memory bank interleaving for the integrated memory controller architecture on AM5.
FCLK Frequency
Auto
Leave Auto at DDR5-6000. Only needs manual adjustment if pushing memory above 6000 MT/s.

Step 4: Precision Boost Overdrive (PBO) - Unlock the 9800X3D's Full Potential

Precision Boost Overdrive is AMD's dynamic overclocking framework. On the 9800X3D, configuring it correctly lets the CPU sustain higher boost clocks for longer, directly translating to higher average FPS and better frame consistency.

AI Tweaker → Precision Boost Overdrive
VRM Throttling
Disabled
Removes a conservative throttle on the VRM that limits sustained boost performance. The X870-F has sufficient VRM capacity to handle the 9800X3D's power envelope without this.
Precision Boost Overdrive
Enabled
Unlocks PBO's full boost headroom.
Thermal Limit
Level 1
Sets the thermal operating ceiling for PBO boost decisions. Level 1 gives the CPU more aggressive boost behavior while remaining within safe thermal bounds.
CPU Boost Clock Override
Enabled Positive
Enables the Max CPU Boost Clock Override field below. Required to increase the PBO boost ceiling.
Max CPU Boost Clock Override
+200 MHz
Raises the maximum single-core boost ceiling by 200 MHz, allowing the 9800X3D to hit 5.4 GHz peak boost on favored cores. This is not a fixed overclock - PBO still governs when and how long it boosts.

Step 5: Curve Optimizer - Undervolt for Higher Sustained Clocks

Curve Optimizer lets you lower the voltage required for each frequency step on the CPU. Less voltage at the same clock = less heat = PBO sustains peak boost for longer. It's the single best free performance tool available on AMD platforms.

AI Tweaker → Curve Optimizer
Curve Optimizer
All Cores
Applies the same offset to every core. Per-core tuning is possible but requires individual core stability testing. Start here.
All Core Curve Optimizer Sign
Negative
Negative = undervolt. Positive = overvolt. Always start Negative.
All Core Curve Optimizer Magnitude
-15
Conservative starting point compatible with nearly all 9800X3D CPUs. If stable after a benchmark pass, you can push to -20 or -25 incrementally. More aggressive values require per-core stability testing via OCCT or Cinebench R23 looping.
⚠ Curve Optimizer Stability Note

If the system crashes or blue screens after applying Curve Optimizer, raise the magnitude toward zero (e.g., -15 → -10 → -5) until stable. A crash means your CPU needs slightly more voltage at those clocks than the offset allows. This is normal - silicon quality varies between individual chips.

Step 6: Tuning Configuration & Why Turbo Game Mode is Wrong for 9800X3D

AI Tweaker → Tuning Configuration
Tuning Configuration (Gaming)
Level 2
Level 2 mode boosts read and write speeds on memory which can help gaming workloads on the 9800X3D.
Turbo Game Mode
OFF - Do Not Enable
See detailed explanation below.
⚠ Do Not Enable Turbo Game Mode on 9800X3D

Turbo Game Mode disables SMT (Simultaneous Multi-Threading), dropping the 9800X3D from 16 threads to 8 threads. With only 8 physical cores, losing SMT leaves the CPU genuinely thread-starved for modern games that use 12+ threads, background processes, and the Windows scheduler - causing micro-stutters and frame drops in exactly the scenarios where you need the most consistent frametimes. Turbo Game Mode is only appropriate on CPUs with 16+ physical cores (e.g., 9950X3D) where disabling SMT still leaves plenty of threads. On the 9800X3D, leave it off and configure the rest of these settings manually.

Step 7: Advanced Tab - CPU, PCIe, USB & System Settings
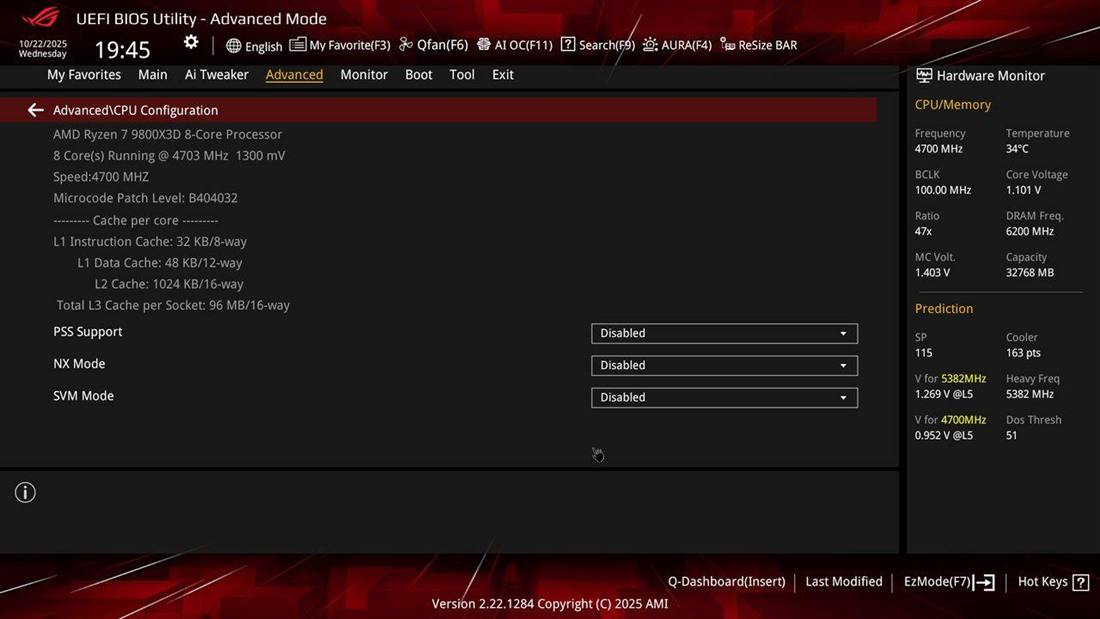
Advanced → CPU Configuration
PSS Support
Disabled
ACPI P-State support - unnecessary with PBO managing frequency scaling. Disabling reduces OS-level frequency management overhead.
SVM Mode (Virtualization)
Disable unless needed
Disable for pure gaming. Keep enabled if you use BlueStacks, WSL2, Android emulation via Google Play Games, or any VM software.
NX Mode
ENABLED - Do Not Touch
Required by multiple anti-cheat systems. Disabling NX mode can prevent games from launching or cause VAC/EAC bans. Leave this on.
Advanced → CPU Configuration: AMD Ryzen 7 9800X3D detected. PSS Support and SVM Mode disabled; NX Mode should remain enabled.
Advanced → PCI Subsystem Settings
Re-Size BAR Support / Above 4G Decoding
Nvidia: Enabled / AMD GPU: Test
On AMD RX 7000 / RX 9000 series GPUs, test with ReBAR enabled - it can help in some titles. On Nvidia GPUs, enable both Above 4G Decoding and Re-Size BAR. They provide negligible benefit on Nvidia in most titles but still good to keep enabled.
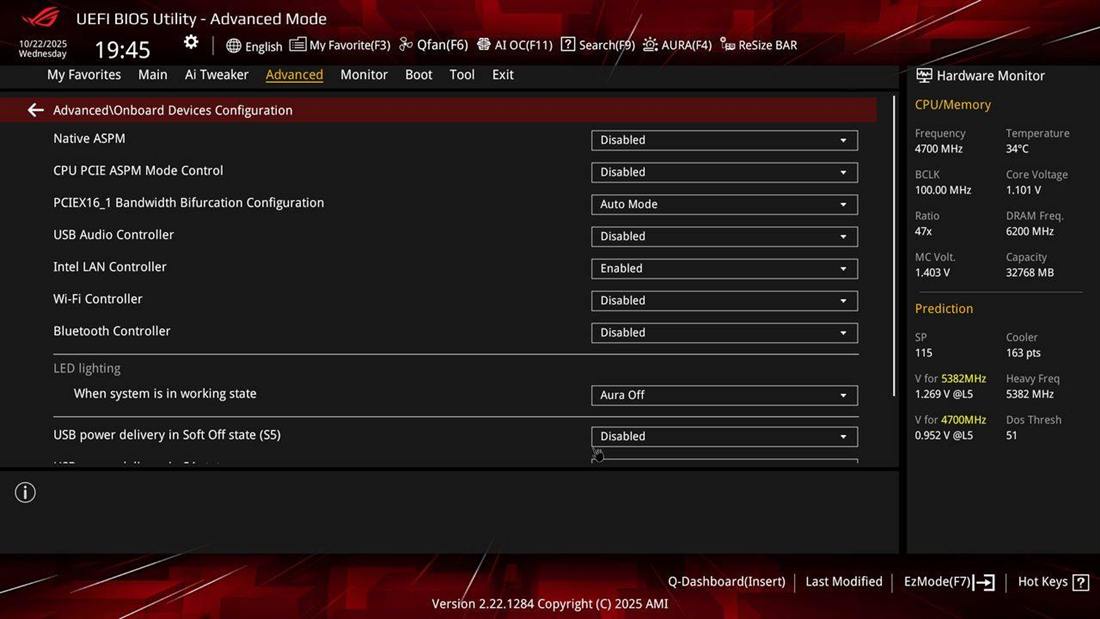
Advanced → Onboard Devices Configuration
ASPM (PCIe Power Saving) - Both Options
Disabled
ASPM puts PCIe devices into low-power states between bursts. This introduces wake latency directly in the GPU render pipeline. Disable for gaming.
USB Power Delivery in S4/S5 States
Disabled
Personal preference - disable unless you need USB devices to charge while the PC is off/sleeping.
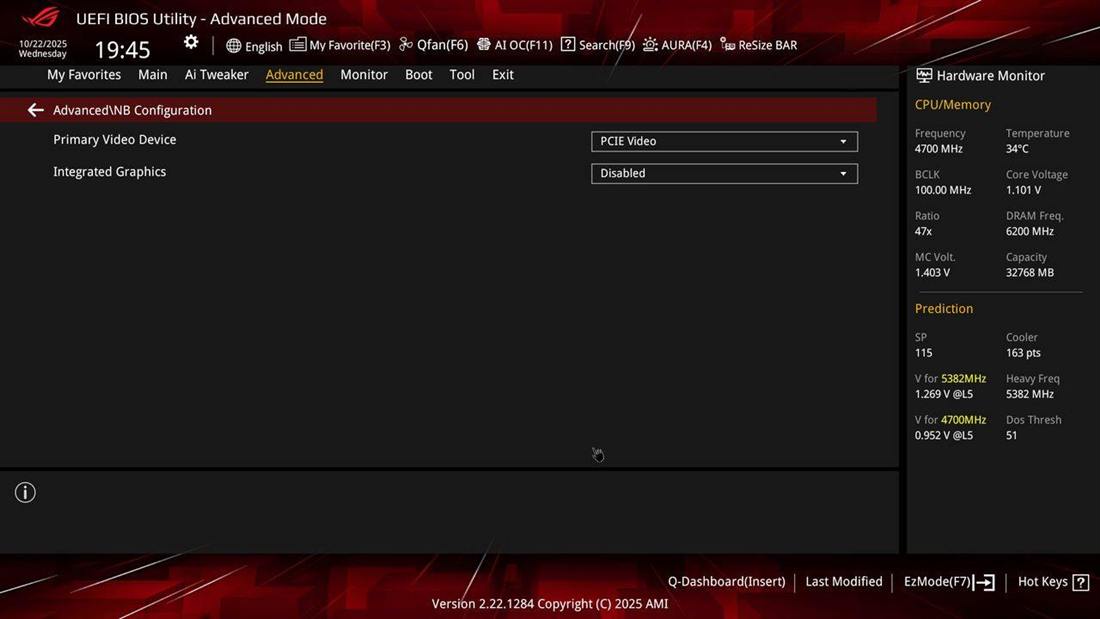
Integrated Graphics (iGPU)
Disabled
Disable if you use a dedicated GPU (99% of people). Leaving the iGPU enabled can cause Windows to incorrectly enumerate display outputs, introducing scheduling conflicts and latency when the OS routes rendering decisions through two graphics devices.
Advanced → Onboard Devices: Native ASPM and CPU PCIe ASPM Disabled. USB power delivery in S5 state Disabled.
Advanced → NB Configuration: Primary Video Device = PCIE Video. Integrated Graphics Disabled.
Advanced → AMD CBS
Global C-State Control
Disabled
Disabling global C-States eliminates CPU idle-to-active transition latency. Testing shows improved input latency and more consistent frametimes in competitive titles.
IOMMU (Virtualization / Security)
Disable unless needed
Same as SVM Mode - disable for gaming, keep enabled if using VMs, GPU passthrough, or certain security software.
ECC Memory Error Correction
Disabled
Must be disabled when overclocking or running XMP/EXPO/DOCP memory profiles. ECC is incompatible with non-standard memory frequencies.
App Compatibility Database
Disabled
Not needed for gaming. Disable to reduce background overhead.

Step 8: Fan Control - Lower Temps Directly Equal Higher FPS on X3D

This is specific to how AMD's Precision Boost Overdrive works. PBO is thermally governed - the algorithm continuously adjusts boost clocks based on current CPU temperature. Lower temperature = higher sustained boost clock = more FPS. This is not just theory; it's measurable in benchmarks.

Monitor → Q-Fan Control (F6)
CPU Fan Header
Full Speed
Set to full speed. The noise trade-off is worth it for the sustained boost clock improvement on a gaming machine.
AIO Pump Header
Full Speed
Always run AIO pump at 100%. Pump speed directly affects coolant flow rate and therefore heat transfer efficiency.
All Other Case Fans
Turbo
Turbo preset is aggressive but not full speed - good balance for ambient airflow without excessive noise.

Step 9: Disable ASUS Bloatware & Save Your BIOS Profile

Tool → Auto-Install Utilities
All ASUS Auto-Install Utilities
All Disabled
ASUS bundles Armoury Crate, AI Suite, and other utilities that auto-install on first Windows boot. None of these are needed and most add background CPU usage and startup bloat. Disable them all here before booting into Windows.
Save a BIOS Profile Before Exiting

Go to Tool → ASUS User Profile → type a profile name → Save to Profile. This lets you restore your exact configuration instantly if a CMOS clear or failed update resets the BIOS. Do this every time you make significant changes.

Real Benchmark Results: Stock vs. Optimized BIOS

Same system, same Windows install, same game settings. Only difference is stock BIOS defaults vs. the full configuration above.

Call of Duty: Black Ops 6 benchmark data ? 1080p
Stock BIOS
Avg FPS
321
1% Low
263
Inconsistent frame times, stuttering
Optimized BIOS
Avg FPS
368
1% Low
295
Smooth, consistent frame times
+47 avg FPS  ·  +32 on 1% lows  ·  ~15% improvement
Fortnite - 1080p
Stock BIOS
Avg FPS
994
1% Low
595
Frame drops during builds & explosions
Optimized BIOS
Avg FPS
1049
1% Low
605
Stable even in chaotic scenarios
+55 avg FPS  ·  +10 on 1% lows  ·  ~5% improvement

Troubleshooting: What to Do If Something Goes Wrong

Common Issues & Fixes
System won't boot after changes
Clear CMOS
Use the Clear CMOS button on the rear I/O. Start without XMP/EXPO/DOCP and re-apply settings one section at a time to isolate the cause.
Memory instability / boot loops
Check Slots + Speed
Ensure RAM is seated in slots 2 and 4 (not 1 and 2). Drop memory frequency to DDR5-6000 if running higher. Verify you're on the latest BIOS - memory training improves significantly with AGESA updates.
CPU temperatures too high / throttling
Fan Speed + Paste
Set all fans to full speed in Q-Fan. Check thermal paste coverage - a thin, even spread across the IHS. Consider upgrading to a 360mm AIO if running a high-end cooler isn't sufficient.
Curve Optimizer causing crashes
Raise magnitude toward 0
Step back from -15 to -10, then -5, until stable. Some CPU samples need less undervolting headroom than others - this is normal silicon variance.

Ryzen 7 9800X3D BIOS Settings Quick Reference Checklist

Complete Setting Checklist - ASUS X870-F
BIOS Updated to Latest Version
✓ Do First
AI Overclock Tuner
DOCP1 / EXPO1 / XMP1
Memory Frequency
DDR5-6000
Refresh Interval
32767
TRDL
12
TRDS
8
Bank Swap Mode
Swap APU
VRM Throttling
Disabled
Precision Boost Overdrive
Enabled
CPU Boost Clock Override
Enabled Positive
Max CPU Boost Clock Override
+200 MHz
Curve Optimizer
All Cores · Negative · -15
Tuning Configuration
Level 2
Turbo Game Mode
OFF
PSS Support
Disabled
SVM Mode
Disabled (unless VM user)
NX Mode
ENABLED
Re-Size BAR / Above 4G
Nvidia: Enabled / AMD: Test
ASPM - Both Options
Disabled
USB Power Delivery States
Disabled
Integrated Graphics
Disabled
Global C-State Control
Disabled
IOMMU
Disabled (unless VM user)
ECC Memory Error Correction
Disabled
App Compatibility Database
Disabled
CPU Fan + AIO Pump
Full Speed
All Other Fans
Turbo
ASUS Auto-Install Utilities
All Disabled
BIOS Profile Saved
✓ Before Exit

Frequently Asked Questions

What DDR5 speed should I use for the Ryzen 7 9800X3D?

DDR5-6000 is the optimal speed for the 9800X3D on AM5. At 6000 MT/s, the memory controller runs in a 1:1 ratio with the Unified Memory Clock (UCLK=MEMCLK). Speeds above 6000 require more SOC voltage and introduce instability risk with minimal gaming gains, since the 9800X3D's 3D V-Cache already dramatically reduces memory latency sensitivity.

Should I enable Turbo Game Mode on the Ryzen 7 9800X3D?

No. Turbo Game Mode disables SMT, dropping the 9800X3D from 16 threads to 8. With only 8 physical cores, losing those threads causes micro-stutters in modern games and background workloads. Turbo Game Mode is only appropriate on CPUs with 16+ physical cores. On the 9800X3D, leave it off and configure the individual settings it enables manually - you get the same performance benefits without the thread starvation problem.

What Curve Optimizer setting should I use for the 9800X3D?

Start with All Cores, Negative, -15. This is conservative enough to work on nearly every 9800X3D without stability issues. Once confirmed stable via a benchmark session, push to -20 or -25 incrementally. If crashes occur, step back toward 0 in increments of 5 until stable.

Should I use DOCP1, DOCP2, EXPO1, or EXPO2?

Always use the Profile 1 variant - DOCP1, EXPO1, or XMP1 whichever appears for your kit. Profile 1 loads primary timings from SPD and lets the motherboard train secondary and tertiary timings itself, which typically produces tighter, faster results than loading the full manufacturer profile via Profile 2.

Does fan speed actually affect FPS on the 9800X3D?

Yes, measurably. AMD's Precision Boost Overdrive scales boost clock speed with CPU temperature in real time. Lower temperature = higher sustained boost = more FPS. Running your CPU fan and AIO pump at full speed is one of the cheapest performance gains available on any AMD X3D system. The noise is a fair trade for a dedicated gaming machine.

How much FPS improvement can I expect from BIOS optimization on the 9800X3D?

Based on direct benchmark testing, the full optimization stack delivers approximately 10-15% higher average FPS compared to stock. In Call of Duty Black Ops 6 at 1080p we recorded a 47 FPS gain (321 → 368 avg). In Fortnite, a 55 FPS gain (994 → 1049 avg). These results are from BIOS configuration alone - no Windows optimization applied yet.

Professional PC Optimization

Your 9800X3D Can Run Even Faster

BIOS is the first layer. Every client PC at Xilly gets the complete treatment - Windows debloat, driver optimization, network tuning, and hardware configuration built specifically around your games and setup. This is what I run for professional Fortnite players, top competitive streamers, and thousands of ranked gamers every week.

Trusted by pro players including Bugha and top competitive Fortnite athletes — tens of thousands of PCs optimized.

About the Author

Xilly works on real gaming PCs with manual BIOS, Windows, driver, and game-specific optimization for competitive players. Learn more about Xilly and our optimization process.